Cartilage Injury in the Knee

Background

There are 2 main cartilage structures in the knee. The hyaline cartilage, also called articular cartilage, lines the end of the bone surfaces of the femur, tibia and patella (the kneecap), acting as a smooth, gliding surface permitting knee joint movement. 

image1
image3

The meniscus, a second type of cartilage, acts as a shock absorber in the knee, preventing damage to the articular cartilage. 

When articular cartilage is damaged, it often causes symptoms such as pain, swelling and locking in the knee.  The cartilage relies on the surrounding joint fluid for its nutrition and has a poor blood supply, hence its inability to regenerate or heal on its own. If left untreated, damaged cartilage predisposes the knee to early arthritis.

image2

Most of the time, damaged articular cartilage requires surgery to remove the non-healing tissue and then an additional procedure to restore or help to regenerate cartilage.

These procedures are described below:

1 - Microfracture- this arthroscopic or ‘keyhole’ procedure involves making small perforations in the subchondral plate to cause bleeding and stem cells to migrate into the cartilage defect.  ‘Scar’-cartilage or fibrocartilage is formed.  This is not as robust as the native ‘hyaline’ cartilage

image5

2 - Cartilage transplantation- cartilage can be harvested from the patient’s own knee in non-essential areas or can be obtained from a donor.  There are pros and cons to each strategy.  Harvesting one’s own cartilage can lead to ‘donor-site’ issues and is limited by the amount of non-essential cartilage available.  For larger areas of damage, donor cartilage can be used to fill the defect.  The donor cartilage is placed into the knee through an open procedure where the damaged tissue is removed and the donor cartilage is implanted.   Donor cartilage carries the risk of allergic reaction, graft rejection by one’s own immune cells and infection.

image4

3 - Osteochondral graft -This is the most complex cartilage restoration operation and is usually indicated where there is considerable involvement of both the bone and overlying articular cartilage. Osteochondral graft involves removing a plug of bone and then using one’s own tissue or donor tissue to fill the defect.  As above, there are pros and cons to each strategy.
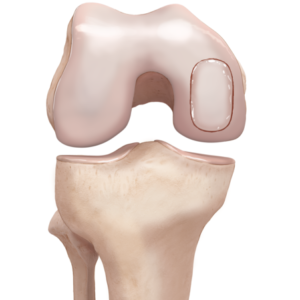
image7
Phase  Goals Weight Bearing/ROM Brace  Cardio/ROM Strengthening
Phase 1 Non Weight-Bearing Phase

(Weeks 0-6) 

  1. Recovery from surgery
  2. Rest, ice compression and elevation
  3. Prevent Muscle Loss
  4. Regain range of motion 
NWB 6 weeks

  • ROM 0-30° for 2 weeks
  • ROM 0-60° weeks 2-4
  • ROM 0-90° week 4-6
Supine/seated ROM only

Heel Slides

Heel Props

Heel Hangs

Multi Plane SLR 

Multi Plane Hip Range

IRQ

Static quads, hamstrings, calf pumps

Phase 2 

Early Weight-Bearing 

(Weeks 6-8)

  1. Full ROM
  2. Gait Re-Training and Quads Control 
  3. Body Weight Strengthening
  • PWB Weeks 6-8, wean crutches once quads control regained
  • ROM Brace Unlocked weeks 6-8
Stationary Bike, no resistance to begin

Treadmill Walking

**Body Weight Strengthening only 

Flexion/Extension only, no side steps or side lunges 

Half squats, Ball squats

Wall slides

Bridges

Forward lunges to 45°

Phase 3

Strengthening

(Week 8-16)

  1. Enhance Strengthening
  2. Loading > body weight 
WBAT Stationary Bike, no resistance to begin (wk 8-10)

Treadmill Walking

Quads, hamstrings, calf strengthening

  • Open chain if femoral condyle lesion only
  • No open chain strengthening for PFJ lesions

Hip abductor and adductor strengthening

Step downs- front, back and lateral

Lateral Lunges

Romanian Deadlift unloaded from week 8, loaded week 10 

From Week 12 

Squats (to chair if appropriate)

Single leg squats to 90°

Loaded Squats and Deadlift from

Single limb balance and proprioception

Stage 4

Week 16+

Return to Sport

  1. Integrate Plyometrics
  2. Return to Functional Activity
  3. Agility Training
WBAT Multi-plane plyometrics

Multi-plane Agility

Cutting and Pivoting Exercises

Ladder Drills

Landing Mechanics

Return to Sport Criteria

Single Leg hop

Quads index > 95%

Hamstrings index >95%

Pain and swelling free post exercise

This rehabilitation protocol relates to any cartilage restoration procedure performed by Dr. Cohen.


General Instructions:

Femoral Condyle and Tibial Lesions

Irrespective of the procedure, patients will remain Non-Weight Bearing (NWB) for 6 weeks

The knee will be placed in a Range of Motion Brace (ROM brace) permitting progressively increasing flexion angles. 

  • ROM 0-30° for 2 weeks
  • ROM 0-60° weeks 2-4
  • ROM 0-90° week 4-6
  • Unlocked week 6-8

Patella and Trochlea Lesions

A ROM is to be applied 0-30° for 6 weeks when mobilising, Patient can weight bear as tolerated with crutches

The knee flexion angles will be allowed to progress slowly to prevent over loading of the PFJ

  • ROM 0-30° for 2 weeks
  • ROM 0-45° weeks 2-4
  • ROM 0-60° week 4-6
  • Unlocked week 6-8

No open chain exercises are allowed for 3 months following this procedure:

Ready to take the next step?

Click on the 'GET IN TOUCH' button and provide your details,
and we'll reach out to arrange an appointment as soon as possible.